Tuesday, May 13, 2014

His: Travel Review - Burning Mountain

If you travel on the New England Highway you may spot a small brown sign that says "Burning Mountain between the small towns of Murrurundi and Scone in Australia. At first there doesn't look like there is much to see as there are no big colourful billboards, buildings or anything that would suggest that this little brown sign would lead to anything interesting. However Burning Mountain, like many other natural attractions are somewhat hidden unless you happen to see the tourist sign in time to pull off the road. Burning Mountain is a underground coal fire that started many thousands of years ago, and is still burning today. It was once thought to be an active volcano, but it has since be determined to be a underground fire that was likely started by a lightning strike. Visitors who walk the trail to the summit, can see the ground smouldering due to the underground fire and is one of the few places in the world where you can see this happen.

The area where you park is fairly basic and has a restroom, a couple of picnic tables and a sign and map showing the map of the trail to Burning Mountain. The trail leads up the hill to the Burning Mountain and takes about 30 minutes to reach the summit. Along the way you will see the landscape change where the fire has been. As you get closer to the summit you will start to smell the suplhur and the smoke from the underground fire. On most days you will even see the heat haze above the ground. There is a elevated walkway that goes across the area that is burning so you can get a birds eye view of the smouldering ground without burning yourself. Aside from the fire there is often many different species of plants and fauna to see and some great views of the surrounding valleys. Below are a few photos of the trail and the Burning Mountain.

 There is no grass growing in certain parts near the area that is currently burning.

Its not showing up in this photo but there is a definete heat haze and it feels quite warm when you are on the elevated pathway.

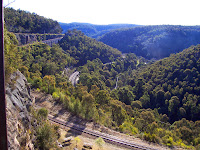
Since there are no trees due to the underground fire you can get excellent views of the valley and see for miles and miles.

The fire has been burning for over 5000 years and is moving south at about 1m (1.1 yards) per year.

Some times during the walk you would find interesting plants including this wattle tree.

A visit to Burning Mountain should take about 1.5-2 hours, and is well worth the stop if you are in the area. Best of all there is no admission charge, so its a great spot to spend a little time out of the car and even have a picnic lunch after your walk. Have you ever been to unusual natural phenomenon like this?


Saturday, May 10, 2014

His: Super Saturday Snapshots


Today we are linking up with Melinda at West Metro Mommy for Super Saturday Snapshots.


Today's photos are from the digital archives and they have an interesting story that I would like to share. A few weeks before Sydney hosted the 2000 Summer Olympics I was in Los Angeles International Airport waiting to fly back to Australia. The plane had mechanical issues, and I was one of about 40 people who were not able to get onto another flight that night. Since I would not make the connecting flight in Sydney to my home town I was given one of two options. I could spend one night in Los Angeles and then one night in Sydney, or I could spend 2 nights in Los Angeles. Although I was tempted to spend a free day exploring LA, I decided to take the next flight out, and overnight in Sydney. The Olympic Torch Relay was coming through my home town and if I stayed two nights in LA I would have missed it. Los Angeles would always be there but the Olympic Torch Relay only comes through your home town once in a life time. 

The Olympic Torch being run through the main street of Tamworth.
Two days later I finally landed in my home town, and headed over to where the relay would be run. It seemed like half the town was there to cheer on the runners.I was tired and jet lagged but it was very special to see the Olympic torch that you see on TV, right in front of your eyes, in your own home town. I am happy that I was able to make it home in time to see the torch, as it is something I am not likely to ever see again.

One of the cauldrons where they kept the flame alight overnight when the relay stopped for the day.

A months later I went to visit a nearby town where they kept the flame overnight in a cauldron. They had the cauldron on display so I took the opportunity to take a few photos.

 The Cauldron with its decorative lid.

I borrowed the lid of the cauldron for a quick photo opportunity. 

Have you ever seen the Olympic Torch Relay or been to the Olympic Games? If not what is your favourite, the summer or winter games?


Wednesday, May 7, 2014

His: Spill mat for Toddlers

I love spending time with my niece whenever I can. Since we live two states away it only happens a few times a year. She is 18 months old and like all children her age she likes to play with her food and toss some of it on the floor. Cleaning up after toddlers often means getting down on your hands and knees and cleaning up the mess piece by piece. However with a spill mat clean up is a whole lot easier!

      These mats makes clean up a whole lot easier as you simply place the high chair in the middle and then pick up the mat when the child is done and shake it off into a trash can. It is fully portable and is a god send when going out to eat. My sister-in-law asked me if I could make her a spill mat a few weeks ago when she was visiting. I had never heard of a spill mat but after getting a description of what it entailed it sounded easy enough and we went to the store to get some fabric. Since she was in town I let her pick the fabric and she found a really fun fabric with whales on it and a matching blue for the backing. There are a few patterns online but I chose to make up my own and I am pretty proud of how well it turned out.


To make a spill mat you will need: 
1 yard (91cm) of material for the front
1 yard (91cm) of material for the back.
Sewing machine
Thread to match the fabric you have chosen.

1: Cutting Material
Cut the material to the front to approx 34 inches (86cm) square.
Cut the material for the back to approx 36 inches (91cm square.
(You can make it larger or smaller depending on your preference but make the back about 2 inches larger than the front to allow for the border.

2: Sewing: 
Sit the front fabric on top of the back fabric and center it. I folded over the backing to the front and folded it under itself to make a nice border. The border should be about 1/2 inch (1.25 cms). Sew around the border ensuring that the border is nice and secure. I went around twice just to make sure.


Once the border is sewn down you are all done and will make a nice gift for yourself (if you have young ones) or for anyone who has young children. It took me a couple of hours to make the mat but most experienced sewers could probably finish this in much less time. 

Its a quick and easy project but will be a big help for cleaning up after meals. I had a lot of fun making this and I am sure it will get plenty of use in the next few years. If you would like to purchase one from me please contact me. What is your favourite item that you have made?

Monday, May 5, 2014

His: Roses in Bloom

Blooming roses means spring is here and winter is gone!
Amanda and I enjoy having a nice garden and even though it takes some work it is nice to see the end result. Sadly we are not green thumbs, and many of our colourful purchases from the nursery have sadly gone off to plant heaven. However we have had a pretty good success with growing roses which was the one thing I really wanted to grow. We started off with one rose bush a few years ago and after it survived we purchased some more and now we have a total of 5 rose bushes in the back yard. They do take a little bit of care, but they seem fairly hardy, and they always look nice when they start to bloom each spring. The blooms were a little late this year since winter held its icy cold grip on us a little longer than normal, but over the weekend the first of the blooms came out. We have a few different colours and below are a few photos of the early blooms.

 This one is a few days from blooming. Even though it is a dark red right now it will bloom as a bright pink flower.

One of the bright pink rose blossoms.

Most of the roses are pink but there are also orange and white.

This is our orange rose bush with one of its flowers.

Sadly there are no photos of the white roses since they are still a few days from blooming.

The rose bushes will continue to flower throughout the year until sometime around October or November. I look forward to the next couple of months which is when they really start to bloom! Which colour rose is your favourite?

Related Posts Plugin for WordPress, Blogger...